Creating a Linux Virtual Machine with VirtualBox
Overview and Prerequisites
A virtual machine is just an empty shell without an operating system, and when it comes to free open source options, Linux is the dominate choice.
Like Windows and macOS, the Linux operating system is home to its own unique ecosystem of software. By installing it in a virtual machine, you'll get a chance to explore these new offerings without being forced to give up your current operating system.
But before you continue this tutorial, there are a few things you'll need to take care of first.
Firstly, your computer needs to be strong enough to run a beefier virtual machine. This means that you'll need at least 8 GB of RAM and more than 20 GB of free space on your hard drive. More RAM is always better, but this virtual machine will only be using 4 GBs of it.
Secondly, this tutorial is aimed at people using VirtualBox as their virtual machine manager. VirtualBox is free software, and I have a guide for installing it over here.
Once VirtualBox has been installed and you're sure that you have enough room on your hard drive, you're ready to continue on to the rest of this tutorial.
Getting AntiX Linux
There are many Linux distros out there, but in this tutorial, we'll be using AntiX Linux. I'll explain why in a moment - first we need to download the ISO image that we'll use to install this distro.
- Open https://antixlinux.com
 in a new tab or window.
 - Click on the big "Download" button on the right of the webpage.
- Scroll down to the section labeled "sysVint" and click on the link that reads "Click to download antix-(some numbers)-Full-32bit.iso".
- This will take you to another website, called SourceForge, where your download should begin automatically. DO NOT click anything on this page - while SourceForge is a reliable website, it's often littered with advertisements that show fake download buttons, and nobody knows where you'll end up if you click on them.
Why AntiX Linux?
Since there are a lot of Linux distros available, you might be wondering why I've selected AntiX Linux instead of say, Ubuntu, Debian, Linux Mint, Slackware, or whatever distro happens to be your personal favorite.
The answer is pretty simple: it's easy to use and runs very well in a virtual machine or other environment with limited resources. When preparing to write this article, I tried installing a handful of Linux distros, and this simply worked the best.
That said, I need to make one thing clear: AntiX Linux is one of the very few distros that comes with a political message. I don't know how software can have a political position, but it's important for me to clarify that I'm only endorsing the software, not whatever political message they want to place on it.
Creating the Virtual Machine
When everything has finished downloading, it's time to create the new virtual machine. Start up VirtualBox and click the NEW button to bring up the new virtual machine dialog.
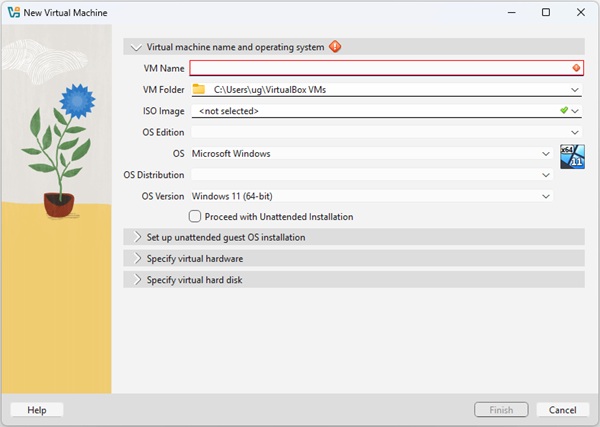
Creating a new virtual machine
- Give your virtual machine a unique name, like "AntiX VM" or something.
- Select the ISO image you just downloaded in the ISO Image field.
- VirtualBox doesn't recognize AntiX, so you'll need to select "Linux" in the OS dropdown and select a distro in the OS Distribution and OS Version fields. It doesn't seem to matter what you choose here; I left mine on Oracle Linux and everything seems to run just fine.
- Under the Specify Virtual Hardware heading, increase the RAM to 4096 MB.
- Under the Specify Virtual Hard Disk heading, ensure that it's at least 20 GB and will be pre-allocated to its full size. Performance will be abysmal if you don't allocate the drive now.
- Click FINISH to create the hard drive and virtual machine.
- Before running it for the first time, select the new virtual machine and then click on the Settings button.
- In the Settings dialog, find the Video options, and set the video memory to 128 MB.
- Close the Settings dialog and start the virtual machine to begin installing Linux.
Installing AntiX Linux
Installing a modern operating system like AntiX Linux can take half an hour or longer, but it shouldn't get "stuck" unless you either missed a step (ie, forgot to pre-allocate the hard drive) or your computer isn't strong enough to run virtual machines.
In other words, this is the moment of truth for your setup.
When that's done, you'll be prompted to make a few choices - ie, define your keyboard layout, tell the installer to use the entire hard drive, and confirm that you want to install AntiX.
Next, you'll be asked to provide some information about yourself and the virtual machine, starting with the name of the computer and the "domain" it belongs to. You don't actually need to know either, so give it whatever name you like and enter "localhost" as the domain.
After setting your time zone, you'll be asked to create the first user account. Both the username and password should be easy enough to remember, so pick them carefully - Linux uses a very strict security system that will require this information whenever you try to make major changes (like installing new software).
Fortunately, you can also enable "Auto Login" from this page, allowing you to skip straight to the desktop when you start your virtual machine.
From here on, it's just a waiting game while the drive is formatted and the files are copied. When the installer is done, it's time to reboot the virtual machine. This can be done automatically: just leave the "Reboot when installer closes" option checked, and close the installer.
When you return to the boot menu, select "Boot from Hard Disk" to launch your new system. In the future, you should eject the AntiX ISO image so that you'll skip this step, but for now we'll leave it.
In other words, this is the moment of truth for your setup.

A look at the AntiX Boot menu
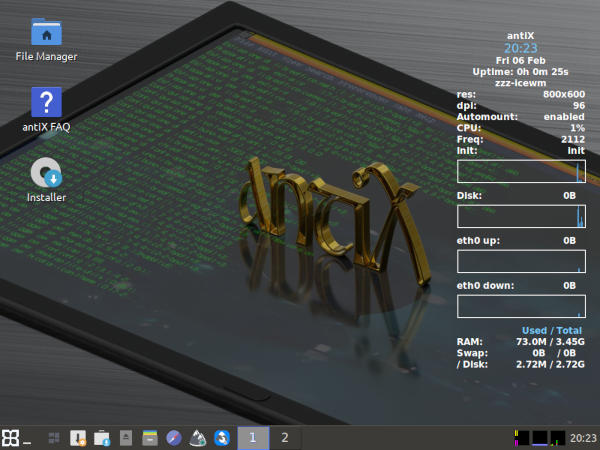
Screenshot of the AntiX Live Desktop
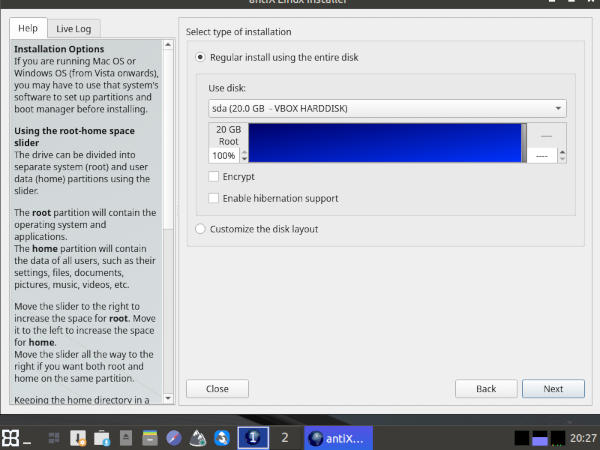
Screenshot of the AntiX installer
When that's done, you'll be prompted to make a few choices - ie, define your keyboard layout, tell the installer to use the entire hard drive, and confirm that you want to install AntiX.
Next, you'll be asked to provide some information about yourself and the virtual machine, starting with the name of the computer and the "domain" it belongs to. You don't actually need to know either, so give it whatever name you like and enter "localhost" as the domain.
After setting your time zone, you'll be asked to create the first user account. Both the username and password should be easy enough to remember, so pick them carefully - Linux uses a very strict security system that will require this information whenever you try to make major changes (like installing new software).
Fortunately, you can also enable "Auto Login" from this page, allowing you to skip straight to the desktop when you start your virtual machine.
From here on, it's just a waiting game while the drive is formatted and the files are copied. When the installer is done, it's time to reboot the virtual machine. This can be done automatically: just leave the "Reboot when installer closes" option checked, and close the installer.
When you return to the boot menu, select "Boot from Hard Disk" to launch your new system. In the future, you should eject the AntiX ISO image so that you'll skip this step, but for now we'll leave it.
Finding Your Way Around AntiX Linux
AntiX Linux is a very neat and tidy distro. Everything has a place, and it's usually easy to figure out where something can be found, but if you'd like a roadmap to your new operating system, I'll walk you through it briefly.
By default, you'll be using IceWM as your window manager* with the toolbar at the bottom of the screen. Most of your everyday programs are already shown in this toolbar as little buttons. From left to right, these are:
One last thing before we move on. Like any virtual machine, you'll need to know how to close down the operating system properly.
In this case, you'll find the "shutdown" option by selecting "Logout" from the bottom of the AntiX menu. Or in other words, open the AntiX Menu, click on "Logout", then on "Shutdown". The virtual machine will close a few seconds later.
* You don't need to know what these are in order to use AntiX.
By default, you'll be using IceWM as your window manager* with the toolbar at the bottom of the screen. Most of your everyday programs are already shown in this toolbar as little buttons. From left to right, these are:
- The AntiX Menu, a Start Menu replacement
- A button that hides everything momentarily
- A workspace* manager
- The AntiX Updater, used to keep your operating system up to date
- The Software Installer, a sort of App store for your AntiX system
- A tool to remove external media (like the AntiX CD-ROM image)
- The File Manager, which lets you view and manage your files
- Your default web browser (a lightweight version of Firefox)
- A tool that lets you customize these options
- The IceWM control panel, used for further customizations
One last thing before we move on. Like any virtual machine, you'll need to know how to close down the operating system properly.
In this case, you'll find the "shutdown" option by selecting "Logout" from the bottom of the AntiX menu. Or in other words, open the AntiX Menu, click on "Logout", then on "Shutdown". The virtual machine will close a few seconds later.
* You don't need to know what these are in order to use AntiX.
Customizing Your AntiX Linux Virtual Machine
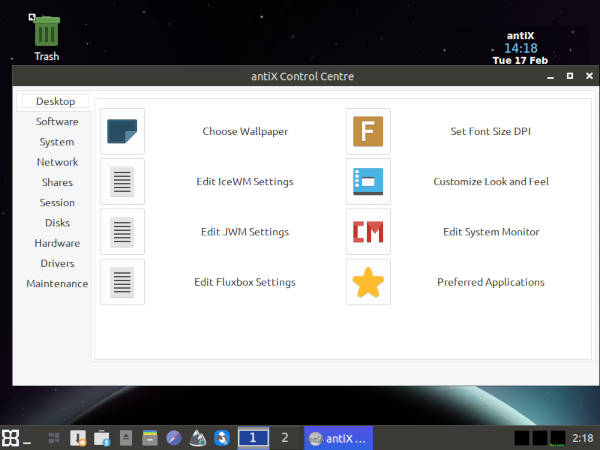
Showing off the AntiX Control Centre
Let me help you with that.
Most of the settings you might want to tweak - like your wallpaper - can be found in the Control Centre, shown above. You'll find the button to launch the Control Centre in the AntiX Menu.
AntiX also has a large number of desktop themes. These can be found in the "Themes" menu, which itself is under the "Settings" menu in the AntiX Menu. If you change it and want to reset it again later, the default theme is called "FX-Dark".
Another thing you might want to change is the readout of data on the right side of the desktop. To turn this on or off, use the "Conky on/off" shortcut in the "Desktop" menu, which is also in the AntiX Menu.
Where to Go From Here?
Now that you have a Linux virtual machine running, what do you do with it?
Well, you could use the Software Installer to find, download, and install some Linux games. There's a large catalog of games available, and it doesn't cost you a thing to add them to your system - just be aware that these games are made by hobbyists, so they'll likely be pretty simple compared to the games you'd find on Steam.
Another thing you can do is install WINE so you can play classic Windows games.
Put simply, go nuts. Try everything. You've already done the difficult part by getting the virtual machine set up and working.