Introducing VirtualBox
Overview
If you want to run a virtual machine, then you'll need a specialized program to manage it. One such solution is Orcale's VirtualBox. This easy to use tool is my preferred all-in-one solution, and the best part is that it's also completely free!
There is, however, an important catch: in order to run the virtual machine, your computer must be strong enough to run itself and the entire virtual computer. Many cheaper or older computers won't have the strength for this.
In fact, if you're really only interested in playing some retro games, you're probably better off just using DosBox or WINE / WineVDM and leaving virtual machines alone.
But if you're willing to take a chance, allow me to walk you through setting up VirtualBox on your computer.
There are also some technical concepts you might want to read up on first, but you don't need to understand them right now.
Acquiring VirtualBox
The first step in playing with VirtualBox is to download it. Just visit VirtualBox.org and then click on the big blue button marked "Download" to reach the page where you can choose which version you want.
On this new page, you'll see a number of links under the heading "VirtualBox Platform Packages". The link you want is in this group - click on the link labeled with the name of your computer's operating system (ie, "Windows Hosts" for most of the people reading this), and the download should begin automatically.
Setting up this device will temporarily disconnect your computer from the internet, so make sure you've finished any other downloads before continuing. If your internet connection doesn't restore itself after the installation is finished, rebooting your computer should fix everything.
Aside from this, using the VirtualBox installer is very straightforward: just run the installer, accept the default options, and wait for it to finish. Windows may require you to give it administrator access, but that's fine.
Once the installation has finished, VirtualBox should be ready for use.
Now, the next section of this page guides you through the creation of your first virtual machine and shows you how to use it to run a small Linux distro from its CD-ROM image.
If you'd rather start with something more serious, I have a real guide on creating a proper Linux virtual machine and another for a FreeDOS. Both of these are fully featured operating systems that come with all sorts of neat software - including a bunch of free games.
On this new page, you'll see a number of links under the heading "VirtualBox Platform Packages". The link you want is in this group - click on the link labeled with the name of your computer's operating system (ie, "Windows Hosts" for most of the people reading this), and the download should begin automatically.
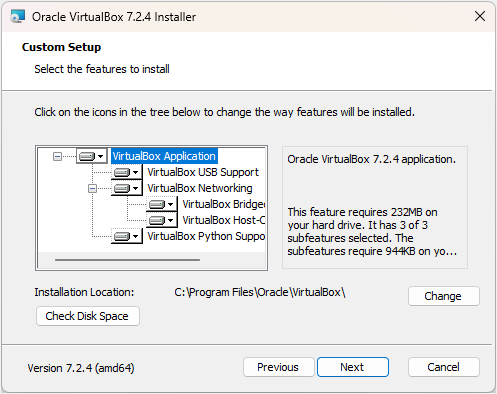
A look at the VirtualBox installer
Setting up this device will temporarily disconnect your computer from the internet, so make sure you've finished any other downloads before continuing. If your internet connection doesn't restore itself after the installation is finished, rebooting your computer should fix everything.
Aside from this, using the VirtualBox installer is very straightforward: just run the installer, accept the default options, and wait for it to finish. Windows may require you to give it administrator access, but that's fine.
Once the installation has finished, VirtualBox should be ready for use.
Now, the next section of this page guides you through the creation of your first virtual machine and shows you how to use it to run a small Linux distro from its CD-ROM image.
If you'd rather start with something more serious, I have a real guide on creating a proper Linux virtual machine and another for a FreeDOS. Both of these are fully featured operating systems that come with all sorts of neat software - including a bunch of free games.
Setting Up Your First Virtual Machine
In order to actually use VirtualBox, you'll need to create one or more virtual machines.
To try things out, let's download a small operating system from the internet and get it working in a virtual machine.
For this example, we'll use TinyCore Linux, a super small Linux distro. This operating system is so tiny that its CD-ROM image is smaller than VirtualBox's installer, making it a good choice for a quick demonstration.
You'll find the download you need on the download page listed as TinyCore (23 MB). Remember: this is a disk image, not a program you can run, so don't try to open or run the file you've downloaded.
When the download has finished, start up VirtualBox and create a new virtual machine for it. Just click on the "New" button or select "New..." from the "Machine" menu to open the New Machine dialog.
The first thing you need to do is give the new virtual machine a name. Pick whatever you like; "TinyCore Demo" works if you can't think of anything else. Next, skip down to the "ISO Image" option and use it to select the file you downloaded a moment ago. VirtualBox should identify it as a Linux distro and fill in a bunch of fields for you.
The last step in creating this virtual machine is to open the "Specify virtual hard disk" section and select "Create Virtual Machine Without a Hard Disk". We're not here to make any commitments - we're just trying it out.
Close the dialog and create the new virtual machine by clicking on the button marked "Finish". When you return to the VirtualBox Manager window, you should see your new virtual machine listed as "Powered Off" on the left and a lot of technical information on the right.
To launch your virtual machine, double-click its label or click the "Start" button while the label is selected. This tells VirtualBox to power up the virtual machine, and if the above steps were done correctly, it will boot into TinyCore's boot menu, shown below.
To continue, press ENTER so that your virtual machine boots from the disk image. This causes a lot of colorful text to go scrolling by, followed by TinyCore's clean desktop.
Unfortunately, there's something we need to tweak before moving on. TinyCore does feature mouse integration, but as of this writing, it's broken. We'll need to turn it off in order to use the virtual machine properly, so look for the "Input" menu on the window and uncheck "mouse integration".
From here, you're free to explore this small system - you can install some programs by using the "App" button at the bottom of the screen, but there's really not much to do. Not that it matters anyway: since there's no hard drive, everything you do in this virtual machine will be lost for good once you turn it off.
While that's how you'd close any other program, you need to remember that virtual machines are meant to function as computers. That means you need to shut them down in the way that their operating system expects. Otherwise, you could damage their file systems, just like how shutting down your real computer improperly could damage it.
So when you're done playing with TinyCore, click on the "Exit" button and select "shutdown" from the menu that appears. Once the virtual machine powers down, the window - and the virtual machine itself - will automatically close.
To try things out, let's download a small operating system from the internet and get it working in a virtual machine.
For this example, we'll use TinyCore Linux
You'll find the download you need on the download page
When the download has finished, start up VirtualBox and create a new virtual machine for it. Just click on the "New" button or select "New..." from the "Machine" menu to open the New Machine dialog.
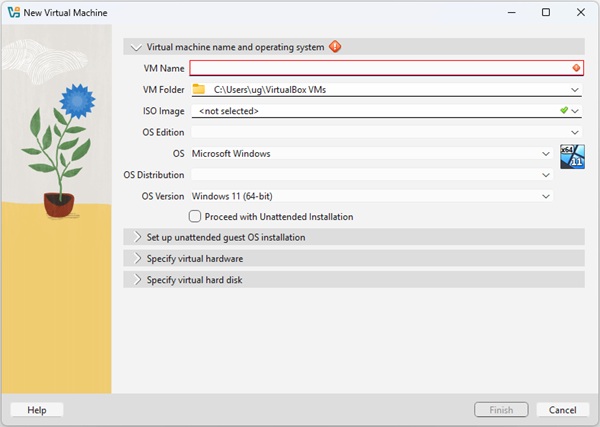
Creating a new virtual machine
The first thing you need to do is give the new virtual machine a name. Pick whatever you like; "TinyCore Demo" works if you can't think of anything else. Next, skip down to the "ISO Image" option and use it to select the file you downloaded a moment ago. VirtualBox should identify it as a Linux distro and fill in a bunch of fields for you.
The last step in creating this virtual machine is to open the "Specify virtual hard disk" section and select "Create Virtual Machine Without a Hard Disk". We're not here to make any commitments - we're just trying it out.
Close the dialog and create the new virtual machine by clicking on the button marked "Finish". When you return to the VirtualBox Manager window, you should see your new virtual machine listed as "Powered Off" on the left and a lot of technical information on the right.
To launch your virtual machine, double-click its label or click the "Start" button while the label is selected. This tells VirtualBox to power up the virtual machine, and if the above steps were done correctly, it will boot into TinyCore's boot menu, shown below.
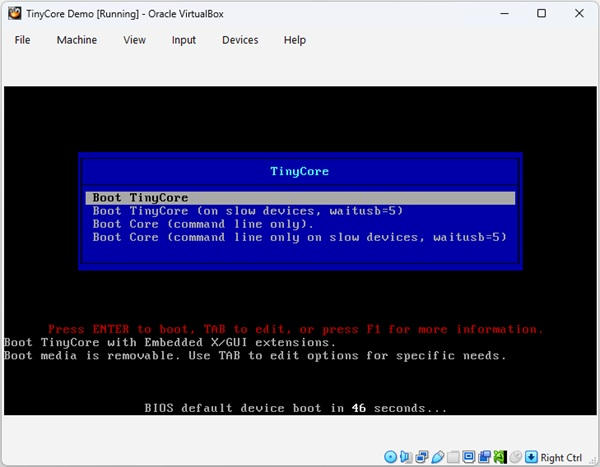
TinyCore Linux's boot menu
To continue, press ENTER so that your virtual machine boots from the disk image. This causes a lot of colorful text to go scrolling by, followed by TinyCore's clean desktop.
Unfortunately, there's something we need to tweak before moving on. TinyCore does feature mouse integration, but as of this writing, it's broken. We'll need to turn it off in order to use the virtual machine properly, so look for the "Input" menu on the window and uncheck "mouse integration".
From here, you're free to explore this small system - you can install some programs by using the "App" button at the bottom of the screen, but there's really not much to do. Not that it matters anyway: since there's no hard drive, everything you do in this virtual machine will be lost for good once you turn it off.
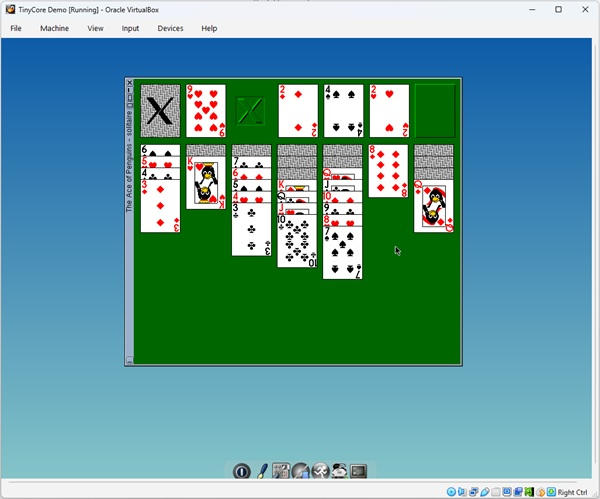
Playing Ace of Penguins on TinyCore
While that's how you'd close any other program, you need to remember that virtual machines are meant to function as computers. That means you need to shut them down in the way that their operating system expects. Otherwise, you could damage their file systems, just like how shutting down your real computer improperly could damage it.
So when you're done playing with TinyCore, click on the "Exit" button and select "shutdown" from the menu that appears. Once the virtual machine powers down, the window - and the virtual machine itself - will automatically close.
What's Next?
If you want to create a more permanent virtual machine to play with Linux, I have a guide on how to set up AntiX Linux available, and for those who want to use virtual machines to play DOS games, I also have a guide for setting up FreeDOS in VirtualBox.
But if you're interested in exploring further, there are countless other Linux distros and operating systems to try. For instance, there's Haiku and HelenOS, neither of which are Linux distros.
For the curious, it's also possible to run different editions of Microsoft Windows with VirtualBox, but to do that legally, you'd need to purchase your copy from somewhere like ebay.
But you don't even need to do that, as there's a better way to legally run old Windows programs - just use WINE or WineVDM.
But if you're interested in exploring further, there are countless other Linux distros and operating systems to try. For instance, there's Haiku
For the curious, it's also possible to run different editions of Microsoft Windows with VirtualBox, but to do that legally, you'd need to purchase your copy from somewhere like ebay.
But you don't even need to do that, as there's a better way to legally run old Windows programs - just use WINE or WineVDM.