Creating a FreeDOS Virtual Machine with VirtualBox
Overview and Prerequisites
Before there was DirectX, OpenGL, and all of those other fancy tools, DOS was the operating system of choice for PC gaming. Today, most people will be using DosBox to play their favorite DOS games, but for those who are more daring, there's always the option of running a real DOS operating system in a virtual machine, and the best way to do that is with FreeDOS.
Keep in mind that this will be a lot more complicated than just using DosBox. In some cases, it's even the inferior choice - VirtualBox doesn't support MIDI devices, which are needed for a lot of classic games.
Before continuing on, this tutorial is aimed at installing FreeDOS in a VirtualBox virtual machine, so you'll first need to have VirtualBox installed and ready to go.
You'll also need to know how to unpack a zip file, as FreeDOS doesn't let you download unpacked ISO Images.
Getting FreeDOS
As you can probably guess, you'll need to download a copy of FreeDOS before you can install it in a virtual machine. This could hardly be easier.
Just head over to https://freedos.org , click on the big blue "Download" button, then scroll down and click on the big blue "Live CD" button under the heading "FreeDOS for Everyone".
When the download finishes, extract the ISO Image from the zip file and place it somewhere you'll be able to find it in just a moment.
Just head over to https://freedos.org
When the download finishes, extract the ISO Image from the zip file and place it somewhere you'll be able to find it in just a moment.
Creating the Virtual Machine
The next step is to create the virtual machine itself. Start up VirtualBox and click the NEW button to bring up the New Virtual Machine dialog.
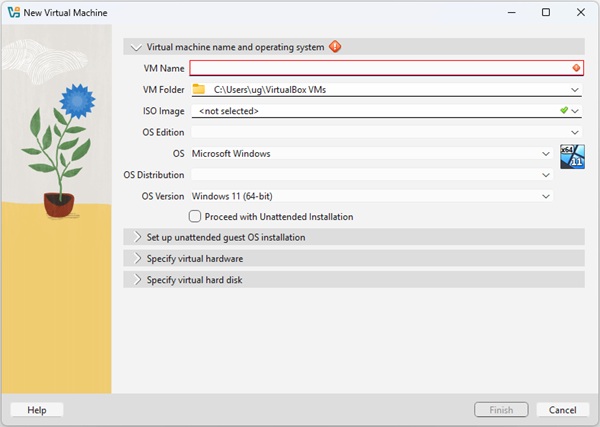
Creating a new virtual machine
- Give your virtual machine a unique name, like "FreeDOS VM".
- Select the ISO image you just downloaded in the ISO Image field.
- VirtualBox doesn't recognize FreeDOS, so set the OS to "other" and the OS Version to "DOS".
- Under the Specify Virtual Hardware heading, increase the ram to 64 MB. This isn't much, but it's more than what most DOS systems had back in the day. It's also what my old Windows 98se machine had, making it a good "large but not too large" amount.
- Under the Specify Virtual Hard Disk heading, ensure that it's at least 2 GB and will be pre-allocated to its full size. FreeDOS can work with less, but let's give it some extra room anyhow.
- Click FINISH to create the hard drive and virtual machine.
- Before running it for the first time, select the new virtual machine and then click on the Settings button.
- In the Settings dialog, find the Video options, and set the video memory to 128 MB. This is an insane amount for older DOS games, but the newer ones might need it.
- Close the Settings dialog and start the virtual machine to begin installing FreeDOS.
Installing FreeDOS
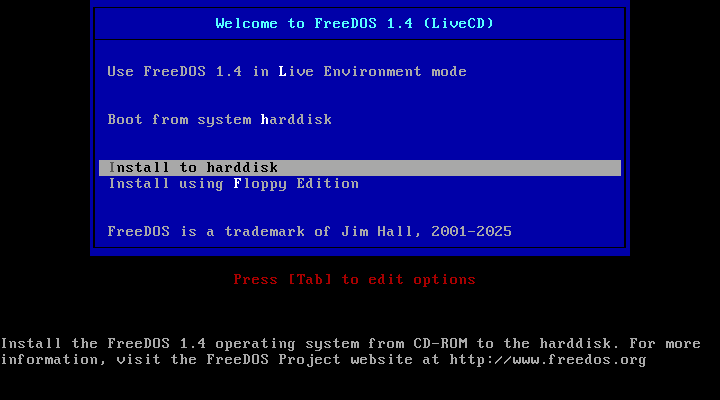
A look at the FreeDOS Installer's Boot menu
It's important to note that this installer works like older DOS programs, so you'll need to use the arrow keys to highlight options and ENTER to select them.
After confirming what language to use, FreeDOS helpfully warns you that this is a full operating system and continuing will erase whatever currently exists on your computer. In short, stop now if you're NOT running this in a virtual machine. Otherwise, select Yes and continue with the installation.
The next step is to partition your virtual machine's hard drive. Select Yes to agree to partition the drive, wait for it to finish, and then reboot. Once you've returned to the boot menu, select "Install to Harddisk" again and continue through the options until you reach the point where it asks to format drive C. Select Yes, wait for it to finish, then press any key to continue.
Select your keyboard layout, then you'll be prompted to select what "packages" to install. To make everything easy, just choose "Full installation including applications and games" and hit ENTER.
Confirm that you want to install FreeDOS one last time, and wait for the installation to finish. It shouldn't take long.
Reboot the virtual machine, then select "Boot from system harddisk" to begin using your new FreeDOS virtual machine.
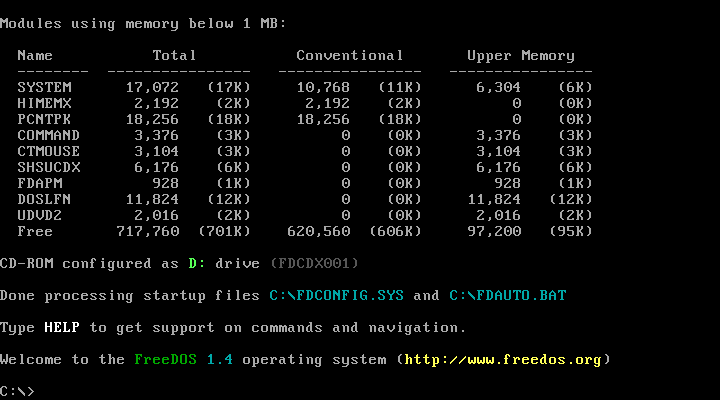
A fresh FreeDOS system.
And you're done!
Where to Go From Here
Now that you have the system set up, what do you do with it?
FreeDOS comes with a handful of free games for you to try out, so navigate to the C:\GAMES folder and have a look.
If you don't know how to do that, here's a quick guide on working with DOS and another that's a guide to FreeDOS.
Just keep in mind that even though FreeDOS is a modern DOS system, it's still pretty limited. Of course, it's more than enough for some fun tinkering, which is likely why you're here in the first place.
Lastly, like any other virtual machine, you'll want to close it down using the method the operating system expects. In this case, enter shutdown at the prompt, press ENTER, and wait a second for everything to stop. The virtual machine window will disappear once it's powered off.